How to Organize Photos on Your iPhone?: A Simple Guide
Hey there! Are you tired of scrolling through endless photos on your iPhone, trying to find that one special picture? Don’t worry, you’re not alone.
Many of us have thousands of photos stored on our devices, making it hard to find what we need when we need it.
But here’s the good news: organizing your iPhone photos doesn’t have to be a headache.
How to Organize Photos on Your iPhone?
In this guide, we’ll walk you through some easy ways to declutter and arrange your photo library.
Whether you’re a photo enthusiast or just someone who likes to capture life’s moments, these tips will help you get your digital memories in order.
Let’s dive in! But, before that, we are so thankful to the tech experts Frontline Feed to help us to explain this process to our readers in a more professional manner.
Why Organizing Your Photos Matters?
Before we get into the how-to’s, let’s talk about why organizing your photos is important:
- Find photos faster: No more endless scrolling to find that one picture you need.
- Free up storage space: By removing unnecessary photos, you can make room for new ones.
- Protect your memories: Organized photos are easier to back up and less likely to get lost.
- Enjoy your photos more: When your pictures are organized, you’re more likely to look at them and relive those special moments.
Now that we know why it’s important, let’s look at some simple ways to organize your iPhone photos.
Step 1: Delete Duplicate Photos
Let’s start with an easy win: getting rid of duplicate photos. We’ve all been there – taking multiple shots of the same thing to get that perfect picture. But do you really need all those extra shots? Probably not. Here’s how to tackle those duplicates:
Why Delete Duplicates?
- Saves storage space
- Makes it easier to find the photos you want
- Reduces clutter in your photo library
How to Delete Duplicates?
- Use built-in iPhone features:
- Open the Photos app
- Go to Albums > Duplicates
- Review and merge duplicate photos
- Try third-party apps: If you have lots of duplicates, you might want to try an app designed for this job. Here are two popular options: • Gemini Photos: This app uses smart technology to find similar photos. • Smart Cleaner: Another app that helps you find and remove duplicate photos.
Pro Tip: Both Gemini Photos and Smart Cleaner offer free trials. You can use these trials to clean up your photo library without spending any money.
How These Apps Work?
- Download and install the app
- Give the app permission to access your photos
- Let the app scan your photo library
- Review the duplicates it finds
- Choose which photos to keep and which to delete
Remember: Always double-check before deleting photos. Make sure you’re keeping the best version of each picture.
Step 2: Delete Unnecessary Screenshots
Next up, let’s talk about screenshots. They’re super useful, but they can also clutter up your photo library fast. Here’s how to deal with them:
Why Delete Screenshots?
- Most screenshots are only useful for a short time
- They take up space that could be used for more important photos
- Too many screenshots make it harder to find your actual photos
How to Find and Delete Screenshots?
- Use the built-in Screenshots album:
- Open the Photos app
- Tap Albums at the bottom
- Scroll down to Media Types
- Tap Screenshots
- Now you can see all your screenshots in one place
- How to delete screenshots:
- In the Screenshots album, tap Select in the top right corner
- Tap the screenshots you want to delete
- Tap the trash can icon at the bottom right
- Confirm that you want to delete the screenshots
Pro Tip: Set a reminder on your phone to go through your screenshots once a week or once a month. This way, you can regularly clear out the ones you no longer need.
What to Keep, What to Delete?
- Keep: Important information you need to reference later, like confirmation numbers or directions
- Delete: Temporary information you’ve already used, like a funny meme you’ve shared or a shopping list you’ve finished with
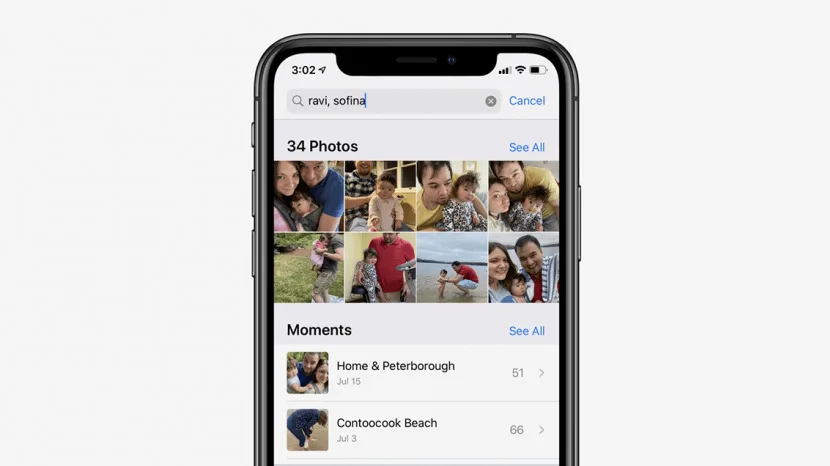
Step 3: Utilize the Search Option
Now that we’ve cleared out some clutter, let’s talk about how to find the photos you want to keep. The search feature in the Photos app is a powerful tool that can save you a lot of time. Here’s how to make the most of it:
How to Use the Search Feature?
- Open the Photos app
- Tap the Search icon (it looks like a magnifying glass) in the bottom right corner
- Type what you’re looking for in the search bar at the top
What Can You Search For?
- People: If you’ve set up Face ID, you can search for specific people
- Places: Search for photos taken in certain locations
- Things: Look for objects or animals in your photos (like “dog” or “beach”)
- Events: Search for holidays or events like “birthday” or “wedding”
- Dates: Find photos from specific dates or time periods
Examples of Searches
- “Dog 2023”: This will show you all photos of dogs taken in 2023
- “Beach vacation”: This will find photos from your beach trips
- “John birthday”: This will show photos of John at birthday parties
Pro Tip: You can combine different search terms to narrow down your results. For example, “dog park 2022” will show you photos of dogs at parks taken in 2022.
Step 4: Using Search to Organize Photos
Once you’ve found the photos you want using search, you can:
- Select multiple photos by tapping Select in the top right corner
- Tap the Share button (the square with an arrow pointing up)
- Choose Add to Album
- Create a new album or add to an existing one
This way, you can easily group similar photos together without scrolling through your entire library.
Use Photo Organizing Apps
While the built-in Photos app on your iPhone is pretty good, there are other apps out there that can give you even more organizing power. Let’s look at a couple of popular options:
#1: Google Photos
What it offers:
- Free cloud storage (up to 15GB)
- AI-powered search
- Automatic organization of photos
How to use Google Photos:
- Download the app from the App Store
- Sign in with your Google account
- Allow the app to access your photos
- The app will start uploading and organizing your photos
#2: Amazon Photos
What it offers:
- Unlimited full-resolution photo storage for Amazon Prime members
- 5GB of storage for non-Prime members
- AI-assisted search
- Ability to share photos with family members
How to use Amazon Photos:
- Download the app from the App Store
- Sign in with your Amazon account
- Allow the app to access your photos
- Start uploading your photos
Comparison Table: Google Photos vs. Amazon Photos
| Feature | Google Photos | Amazon Photos |
| Free Storage | 15GB | 5GB (Unlimited for Prime members) |
| AI Search | Yes | Yes |
| Automatic Organization | Yes | Yes |
| Family Sharing | Yes | Yes |
| Full Resolution Storage | No (unless you pay) | Yes (for Prime members) |
Pro Tip: You can use both apps together. For example, you could use Google Photos for its excellent search features and Amazon Photos for full-resolution backup if you’re a Prime member.
Step 5: Create a “Print-worthy” Album
In this digital age, it’s easy to forget about the joy of holding a physical photo. Creating a “print-worthy” album can help you keep track of the photos you want to print someday. Here’s how to do it:
Why Create a Print-worthy Album?
- Makes it easy to find your best photos when you’re ready to print
- Helps you remember which photos you want to print
- Allows you to curate a collection of your favorite memories
How to Create a Print-worthy Album?
- Open the Photos app
- Tap the Albums tab at the bottom
- Tap the + sign in the top left corner
- Choose New Album
- Name your album (like “Photos to Print”)
- Select the photos you want to add
- Tap Done
What Photos to Include?
- Special occasions: Birthdays, weddings, graduations
- Travel memories: Beautiful landscapes, fun moments from trips
- Everyday moments: Candid shots that capture your daily life
- Portraits: Nice photos of family and friends
Pro Tip: When you’re adding photos to this album, think about how they might look printed. Photos that look great on a phone screen might not always translate well to print.
Using Your Print-worthy Album
Once you’ve created your album, you can easily access it when you’re ready to print:
- Go to your Print-worthy album
- Select the photos you want to print
- Tap the Share button
- Choose a printing option (like Print or a photo printing service)
This way, when you finally decide to print some photos, you won’t have to spend hours scrolling through your entire library.
Bonus Tips for Photo Organization
Now that we’ve covered the main strategies, here are some extra tips to help you keep your photos organized:
1. Use Favorites
- Tap the heart icon on photos you love
- All favorited photos appear in the Favorites album
- Great for quick access to your best shots
2. Create Smart Albums on Mac
- If you use a Mac, you can create Smart Albums that automatically update based on rules you set
- For example, you could have a Smart Album for all photos taken in a specific location
3. Use iCloud Photos
- Keeps your photos synced across all your Apple devices
- Saves storage space on your iPhone by keeping full-resolution photos in the cloud
4. Regularly Review and Delete
- Set aside time each month to go through recent photos
- Delete blurry or unnecessary shots
- This keeps your library manageable
5. Use Descriptive Album Names
- Instead of “Vacation 2023,” try “Italy Trip – Rome and Florence 2023”
- Makes it easier to find specific photos later
FAQs:
Q: How often should I organize my photos?
A: It’s best to do a little bit regularly, like once a week. This way, it never becomes a big, overwhelming task.
Q: Can I recover deleted photos?
A: Yes, recently deleted photos stay in the “Recently Deleted” album for 30 days. After that, they’re permanently deleted.
Q: How do I free up space if my iPhone storage is full?
A: Start by deleting duplicates and unnecessary screenshots. You can also use iCloud Photos to store full-resolution photos in the cloud.
Q: Is it safe to use third-party photo organizing apps?
A: Most reputable apps are safe, but always check reviews and privacy policies. Stick to well-known apps from the App Store.
Q: Can I organize photos on my iPhone without using iCloud?
A: Yes, you can organize photos directly on your device using the Photos app. However, using iCloud gives you more storage and syncing options.
Q: How do I create albums for specific events or trips?
A: In the Photos app, tap Albums > + > New Album. Name your album and select the photos you want to include.
Q: Can I edit photos while organizing them?
A: Yes, you can edit photos right in the Photos app. Tap on a photo, then tap Edit in the top right corner to access editing tools.
Q: How do I share organized albums with family and friends?
A: You can create shared albums in the Photos app. Go to Albums > + > New Shared Album, then invite people to view and add photos.
Q: What’s the best way to back up my organized photos?
A: Use iCloud Photos or another cloud service like Google Photos or Amazon Photos. You can also back up to a computer using iTunes or Finder.
Q: Can I use Siri to help organize my photos?
A: Yes, you can ask Siri things like “Show me photos from last Christmas” or “Find photos of my dog.” This uses the same search feature we discussed earlier.
Conclusion:
Organizing your iPhone photos doesn’t have to be a daunting task.
By following these simple steps – deleting duplicates, managing screenshots, using the search feature, trying photo organizing apps, and creating a print-worthy album – you can turn your cluttered photo library into a well-organized collection of memories.
Remember, the key is to make photo organization a regular habit. Spend a little time each week keeping things tidy, and you’ll never have to face an overwhelming mess of photos again.
With your newly organized photo library, you’ll be able to find and enjoy your favorite memories whenever you want.
So why wait? Open up that Photos app and start organizing. Your future self will thank you when you can easily find that perfect photo to share at your next family gathering or to post on social media. Happy organizing!